December has finally arrived. It is the season to be jolly, for the good children to have gifts, and for the family to come together and celebrate the most wonderful time of the year.
When we think about Christmas, we think of family, good foods, good drinks, and of course, good CAKES. What would Christmas dinner be without desserts? Just the presence of a festive cake on the table and the smell of sweet aroma filling in the air would surely remove any bits of grumpiness left in anyone.
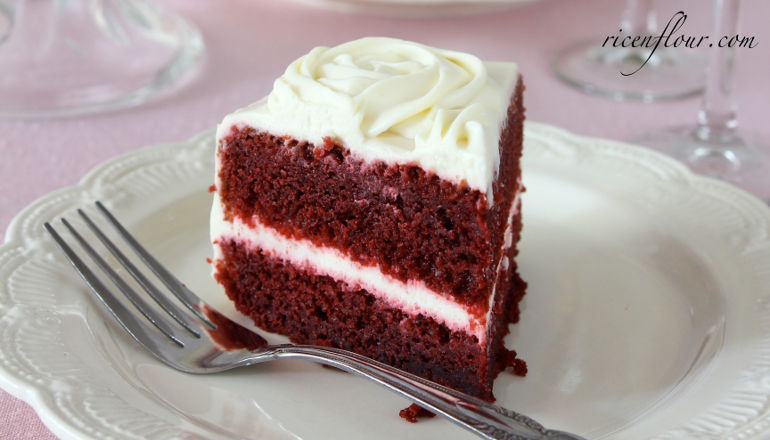
In the spirit of such joyful occasion, I’d love to serve a cake that is elegant, delicate, sophisticated, yet at the same time, sexy, lascivious, and irresistibly seductive. With a blazing red sponge in contrast with the luscious cream frosting, the impressive looking Red Velvet Cake perfectly fits the description. Not just that, Red Velvet Cake holds a perfect balance between the scrumptious, dark cocoa flavor, the rich taste of whipping cream and a hint a tartness from the cream cheese frosting. Who can resist such delight? After all, Santa still needs to be bribed when he pays you a visit 
 EQUIPMENT: One 20 – 22cm diameter round cake pan
INGREDIENTS
A. Red Velvet Cake
- 240 ml (1 cup) whole milk – room temperature
- 15 ml (1 Tbsp) white vinegar or lime juice
- 240 gram ( 2 cups) all-purpose flour
- ½ tsp baking powder
- 20 gram (3 Tbsp) cocoa powder
- 120 gram (1/2 cup plus 1/2 Tbsp) unsalted butter – let soft at room temperature
- 170 gram (1/2 cup plus 4 Tbsp) caster sugar
- 2 medium eggs (60 – 65 gram/egg including shells) – room temperature
- 1 tsp vanilla extract
- 20 ml (4 tsp) liquid red food coloring
- 1 tsp (5 gram) baking soda
- 1 tsp (5 gram) white vinegar
B. Cream Cheese Frosting
- 250 gram (8.8 oz) cream cheese – room temperature
- 150 gram (5 oz) mascarpone cheese – room temperature
- 1 tsp vanilla extract
- 70 gram (1/2 cup plus 1 Tbsp) icing/confectioner’s sugar
- 200 ml (1 cup minus 3 Tbsp) whipping cream (35 – 40% fat) – chilled
* If you don’t have mascarpone cheese on hand, substitute with whipping cream of same amount
INSTRUCTIONS
A. Red Velvet Cake
1. Preheat the oven at 170˚C/ 340˚F (top and bottom heat). Grease the cake pan with butter or cooking spray. Line a piece of wax/parchment paper at the bottom.
2. Add 15 ml white vinegar (or lime juice) into 240 ml of milk. Mix well then set aside for 10 – 15 minutes. Acid will curdle the milk and create a mixture that is similar to buttermilk. You can also use 240 ml of buttermilk directly.
3. In a bowl, sift in flour, baking powder, and cocoa powder, and mix well using a wire whisk (pic. 1).
4. In another bowl, beat the butter at medium speed for 1 minute till soft and smooth. Set the speed at medium low, gradually add in sugar, mix well until incorporated before adding extra sugar.
5. When all of the sugar has been combined with the butter, raise the speed to highest, beat until butter becomes very soft, smooth and turns ivory in color (pic. 2). While beating, stop the mixer regularly to scrape butter off from the sides of the bowl.
 6. At low speed, beat in egg, one by one, until well blended (pic. 3 – 4). Do not overmix. Add in vanilla extract, blend and scrape down the sides and bottom of the bowl.
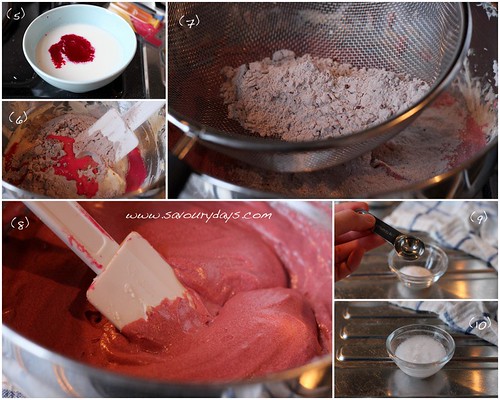
7. Add red food coloring into the milk-vinegar mixture that was prepared at step (2), mix till well blended (pic 5).
 8. Divide the flour mixture (from step 3) into 4 parts, and the milk-vinegar mixture above into 3 parts.
Add 1 part of the flour mixture and 1 part of the milk-vinegar mixture into the bowl of butter and beat at low speed until just incorporated. Don’t overmix as it will make the cake dense and heavy. Continue to add in another part of the flour mixture and the milk-vinegar mixture, mix again till completely combined. Continue with the rest of flour and milk. (pic. 6 – 7 – 8).
9. In a small bowl, mix white vinegar with baking soda; the mixture will bubble up (pic. 9 – 10). Once it stops bubbling, add this to the batter and quickly fold in.
10. Pour the cake batter into prepared pan. Use an offset spatula to smooth out the surface. Bake at 170˚C/ 340˚F in 25 – 30 minutes. Check if the cake is done by inserting a toothpick in the middle and see if it comes out clean. Another method is to check if the middle of the cake feels springy and pillowy when you gently press your fingers against it.
11. Once done, take the cake out and let it cool completely on a wire rack.
* Note: Depending of the type of food coloring you use, the color may come out differently. Water-based food coloring will give out a better looking color than a gel-based one. I used Stadler’s red food coloring.
B. Cream Cheese Frosting
1. In a bowl, beat cream cheese and mascarpone cheese (room temperature) at low speed for about 30 – 45 secons till smooth. Add in icing sugar and vanilla extract; beat for another 30 seconds till smooth.
2. Add in whipping cream. Beat at medium speed until stiff peaks form. Note: Whipping cream gets thick fairly quickly and hence, you should use medium-low speed. Overbeating will cause the cream to separate.
3. Let the frosting chill in the fridge for 30 – 60 minutes to increase its thickness so that it is easier to spread.
C. Assemble the Cake
– After cake has completely cooled down, with a serrated knife, cut the cake into 2 or 3 layers. Spread some frosting onto the first cake layer. Place another layer of cake on top of the frosting and continue to frost and stack the cake layers. Frost the top and sides of the cake. Decorate as desired.
– To pipe icing roses as seen in picture, you can use Wilton’s 1M tip (swirl/open star) or 2D tip (drop flower/closed star). Hold the piping bag straight up, start frosting from the outside edge and begin swirling around the outside edge. Continue in a spiral motion; create another layer of icing, working in toward the center. If you want to pipe flowers around the sides of the cake, you should let the frosting chill in the fridge for at least 2 hours so that it firms up more and when piped, it will hold its shape.
– Refrigerate as soon as finished; the cake tastes best when served after chilled overnight.


JOIN US